TSH v4 Functionality Improvements
Forcing USB IDs
By default axes X1 – V1 are read from USB ID1, axes X2 – V2 are read from USB ID2, axes X3 – V3 are read from USB ID3, etc. To identify which controllers are on which USB IDs, go to the Test Controller(s) tab of the TSH Manager, select the USB ID from the single dropdown box, and move axes on the controller. Repeat with a different USB ID selected until that controller’s physical axes move the axis displays on-screen.
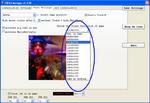
If you find your controllers to be “out of order” (a common example would be that the controller you wish to use for axes X2 – V2 is on ID3), check the Force USB ID in game box. Then, select the number of the actual ID in the dropdown under the ID that you want to force. For this example, the appropriate settings are shown in the image on the left. This will force controller 3’s axes to be seen as coming from controller 2, and vice versa.
If you previously had to disconnect other controllers in order to get your joystick to be recognized in Jane’s F/A-18, forcing IDs can eliminate this necessity. Simply identify the ID of your joystick, then select that number in the dropdown box under USB ID1. This will allow this controller’s buttons and axes to be used as the primary controller in Jane’s F-18 even if it is not recognized in Windows on ID1. It may also be necessary to select a controller as Windows’ preferred legacy controller. To do this, go to Control Panel > Game Controllers > Advanced and select the desired controller.
If the above is confusing, remember that the single dropdown box has no effect in-game and is simply there for ID identification, while the three dropdown boxes at the bottom of the TSH Manager will force new USB IDs in-game if the Force USB ID in game box is checked.