TSH v4 Mission Improvements
New Ground Object / Plugin Functionality
First, a short definition. A plugin is a collection of objects. Normally the distinction between the two is not necessary, and in fact the Jane’s F-18 Mission Builder refers to “object” when “plugin” is really meant. The same distinction is not made in other sections of this manual; however, in this section the difference between the two is important.
Editing Plugins
TSH v4 provides enhanced abilities for manipulating plugins once they are placed on the map. In addition, there are undocumented commands for manipulating plugins that existed in the stock version of Jane’s F-18. Together, these commands are:
- U: move a plugin or object UP
- D: move a plugin or object DOWN
- R: move a plugin or object RIGHT
- L: move a plugin or object LEFT
- I: toggle Individual object selection ON/OFF
- N: select Next individual object if above toggle is ON
- O: rotate object (or all objects in plugin) LEFT
- T: rotate object (or all objects in plugin) RIGHT
- F12: toggle object ID numbers ON/OFF
- F4: rotate plugin in 90-degree increments
Slots for New Plugins
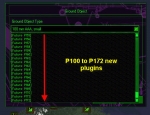
The stock version of Jane’s F-18 contains 93 available plugins. TSHv4 adds 6 more plugins (farm1, farm2, oil see refinery, double-cross-linked SA-10, small nuclear facility, and harbor) and add slots for 173 additional plugins. These 173 slots can be used for any plugins created by a user (see below for a description of how to do this) or any plugins imported from Jane’s F-15. In order to use these new plugins slots, plugins must simply have filename of XXX.plg, where XXX is a number from 100 to 172, and the .plg file must be located in the \FA-18\Ncape\plugin folder. The Mission Builder will look for files in this location regardless of which theater is active. In the Mission Builder the plugins will appear in the “Ground Object” list as [Future P100] through [Future P172].
Inserting New Ground Plugins
Creating New Plugins & Adding/Deleting permanent plugins from the map
TSH v4 allows the mission creator to build a new plugin out of a combination of pre-existing mission plugins, stock plugins that have been added to the map, and plugins imported from Jane’s F-15. These plugins can then be positioned and rotated to suit, and the individual objects inside all of the plugins can also be positioned and rotated to suit. After this is done, the mission creator selects the set of objects to use in the new plugin and gives it a label. This set of labeled objects is then converted to a single plugin via an external program, renamed, and placed in the appropriate location. The specific steps are as follows:
- Start Jane’s F-18.
- Open the Mission Builder.
- Open an existing mission or work with the default new mission.
- Place at least one plugin or navigate to the site of an existing plugin.
- Add additional plugins as desired.
- Manipulate the plugins and objects with the U, D, L, R, T, O, I, N, F12, and F4 keys to arrange everything in the proper locations and orientations.
- Open the Add Moving Vehicle menu.
- Select Camel in the Vehicle Type dropdown box. TSH dd-ons use the camel as a marker.
- In the Label box, type the name you desire for your new ground plugin.
- Press OK.
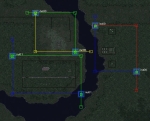
- Give the camel two waypoints that will form two sides of a rectangle around the desired objects to be included in the new plugin.
- Repeat steps 7-11 to add another camel and waypoints on the other two sides of the rectangle. It is important to give the second camel the same label as the first.
- Save the mission and remember the filename.
- Close Jane’s F-18.
The above procedure can also be used to add or delete permanent plugins from the world map. Once added, a plugin’s damage is tracked throughout the progress of a campaign. In order to delineate files for addition or deletion, they are marked with camels as described above. However, plugins for addition must be bound by camels with a label of insXX, and plugins for deletion must be bound by camels with a label of delXX. “XX” is a number between 00 and 09.
Adding/Deleting permanent plugins from the map
After a mission has been marked with camels for plugin creation, addition, and deletion, perform the following steps:
- Download the TSH Plugin Extractor.
- Extract the contents of the downloaded .zip to a folder of your choice.
- Run PlgExtractor v20.exe.
- Select the mission containing plugins to create, add, and/or delete.
- Select the .ins file corresponding to the correct theater (ncape.ins or iraq.ins).
- Select the .fam file corresponding to the correct theater.
- If desired, select the appropriate .alt file (described below).
- Press the “Launch” button.
- A folder with the name of the selected mission is created in the folder containing the plugin creator. In this folder you will find the following files
– .plg files named according to the camel labels you originally selected. These are new plugins for use in other missions.
– delXX.del, a log of the deleted objects.
– insXX.ins, containing the new objects to add to the ins file.
– newins.ins, the new .ins file file created after plugins have been added and deleted.
– add.txt, a description of added objects (hexadecimal and decimal serial numbers, altitudes)
– newins.txt, a description of objects in newins.ins (hexadecimal and decimal serial numbers, altitudes [except the new objects]
– inslog.log, a log file of the operations. - The .plg file(s) should be moved the to the \FA-18\Ncape\plugin folder for use in further mission building. They should be renamed as appropriate (i.e. 100.plg, 101.plg, …, 171.plg, 172.plg).
- The new .ins file can be used in place of the existing theater .ins file.
New plugins can be added to a mission using the Ground Object menu. Once a mission with new plugins is saved, it can be distributed to other users without the associated .plg files; these are stored inside the mission file.
Using the .alt file to adjust plugin heights
When plugins are added, it can be necessary to adjust object altitudes so that all objects appear level on the terrain surface. For example:
It is important to note the serial number of objects that need altitude modifications. Check these in the mission builder using the F12 key.
After the Plugin Extractor is run once, the add.txt file gives some extra information about the objects it has manipulated; we are told the hexedecimal and decimal serial numbers, the altitude of objects in meters, and the family of the objects:
-(H)002384-(D)009092 alt:00057 —Warehouse, large – ware01b
-(H)002386-(D)009094 alt:00057 —Warehouse, large – ware01b
-(H)002388-(D)009096 alt:00057 —Warehouse, large – ware01b
-(H)00238A-(D)009098 alt:00057 —Warehouse, large – ware01b
-(H)00238C-(D)009100 alt:00057 —Warehouse, large – ware01b
-(H)00238E-(D)009102 alt:00057 —Warehouse, large – ware01b
-(H)002390-(D)009104 alt:00057 —Warehouse, large – ware01b
-(H)002392-(D)009106 alt:00057 —Warehouse, large – ware01b
-(H)002394-(D)009108 alt:00057 —Warehouse, large – ware01b
-(H)002396-(D)009110 alt:00057 —Warehouse, large – ware01b
-(H)002398-(D)009112 alt:00057 —Warehouse, large – ware01b
-(H)00239A-(D)009114 alt:00057 —Warehouse, large – ware01b
-(H)00239C-(D)009116 alt:00057 —Warehouse, large – ware01b
-(H)00239E-(D)009118 alt:00057 —Warehouse, large – ware01b
-(H)0023A0-(D)009120 alt:00057 —Warehouse, large – ware01b
-(H)0023A2-(D)009122 alt:00057 —Warehouse, large – ware01b
-(H)0023A4-(D)009124 alt:00057 —Warehouse, large – ware01b
-(H)0023A6-(D)009126 alt:00057 —Warehouse, large – ware01b
-(H)0023A8-(D)009128 alt:00057 —Warehouse, large – ware01b
-(H)0023AA-(D)009130 alt:00057 —Warehouse, large – ware01b
-(H)0023AC-(D)009132 alt:00057 —Warehouse, large – ware01b
etc.
In order to modify object altitudes, the Plugin Extractor needs a .alt (altitude) file. To create the .alt file, copy the file add.txt and rename it as add.alt. Open add.alt in a text editor and replace the “-” with a “*” at the beginning of each line you want to modify. Then enter the new altitude in meters, always using 5 characters. Below you can see the results of changing some of the warehouses from 00057 meters to 00067 meters; it’s not perfect, but it shows the improvement and can be refined with further tweaking.


